|
Fabrication
(Who me? Make it myself?)
For most of us, the idea of making a component for a tractor is so foreign that we never even consider it as an option. Indeed there are many good reasons not to manufacture your own parts but those reasons are not the main ones that usually stymie most tractor enthusiasts. In my experience, the main reason mosts folks never consider the option is an unwavering belief that they aren't capable of such magic. Over the next few months, we will cover a few simple components that can be made in a very small shop with few tools. If you have the need, you might be tempted to give it a try. Many of us have purchased tractors that have years of "field engineering" applied by their previous owners and have a distaste for the hack-like fabrications used to keep the machine together. Your fabrications will not be done in this manner. Remember that most of those quick-fixes were applied to keep the tractor functioning during the middle of a crisis like having a field half-plowed. If they held, the quick-fix turned in to a permanent repair. Your fabrications will be done at leisure and with care. Once you accomplish a couple of fabrications for your machine, you will experience a new level of pride and confidence in your tractor mechanic abilities.
First of all, what are the reasons for not fabricating your own parts? Most judgements on what should be purchased rather than fabricated stem from:
- Originality - If the tractor restoration is to be 100% original, it is likely that you should spend the time and money to locate the component in the used or New-old-stock market. Since this can be extremely difficult, you may want to fabricate the item or purchase a modern replacement temporarily, but eventually, you should find the real McCoy.
- Cost - Even if you can fabricate a component, sometimes it is cheaper to purchase one. Due to cheap labor and production line processes, it is sometimes difficult to match the price of a foreign made replacement part. Castings are a good example of this.
- Complexity and Time - Many fabrication processes are easily within grasp of us shade tree types but some require years of experience or at least a tremendous amount of study and practice. For example, bending square or round corners in sheet metal requires a small amount of study and practice but several compound corners on one component may require making many copies before you get an acceptable piece.
- Quality - If you don't have the time to invest in getting it right, you may get a better quality component by buying. As I say that, I would want you to remember that just because a large manufacturer has made the component, it does not guarantee that their component will be as good as yours. I am a parts dealer and have seen this firsthand.
- Safety - Probably the most important issue mentioned. While it is possible to fabricate a part that exceeds the strength of an original component, you have to look at whether the parts will be stressed and if you can decipher why they engineered the piece as it was.
Looking at your tractor from this standpoint usually makes it obvious which parts are do-able, economical, and safe to make. As you become more confident in fabrication, you will slowly see more and more items that can be fabricated (the more you do, the more you know and the more you can do...).
Well, you must be wondering... Where do I start? This depends on your background. If you have had a metal shop class, you may already have the basic concepts for simple projects. If not, the library will provide a wealth of metal working books (not all fabrication projects are metal working, sewing is a great skill for the seats of some of my machines). The real key is picking simple projects that can be accomplished without first becoming an expert, purchasing expensive tools, and locating exotic materials. The first project could be as simple as fabricating an "L" bracket for holding a footrest. Simply buying a piece of stock at the hardware store, drilling two holes, and bending it at the right point would be a first step in your trek to become a amateur metal worker. You may say "that's not a project!", I would say yes because it is the start of thinking along the lines of "I can make it myself". A first project should be easy to conceptualize, require a miminum of tools and not take too long. Certainly brackets of many types fit into this category as do smaller sheet metal components (e.g., battery box cover) with relatively few bends (preferably right angles). To initially keep your costs and knowledge requirements down, things to avoid are items that require heat to bend, castings (that cannot be easily simulated with bar stock, or sheet metal that requires so much working that the steel will need annealing (heating and cooling treatments).
For the types of beginning projects mentioned, you will need some tools. Fortunately, the tools you need are simple and you probably already have them if you have a tractor. They are:
- Vise - You don't absolutely need a vise but it is so basic to a shop and so commonly and cheaply available that I recommend having one. For convenience, get at least a 6 inch vise and bolt it securely to a solid bench. You will seldom stress the vise during fabrication since most processes are done with finesse rather than brute force. But... once you have the vise you will commonly use it for other processes that will test it mountings (like using a 36 inch pipe wrench to pull a 2 5/8 trailer ball from a receiver hitch). Because of this you may want to make your first fabrication project be making a steel plate to go under the bench for lateral strength). You will pay from $49 to $350 for a 6 inch vise (depending on what you can afford).
- Anvil - The most ideal general purpose tool will be to have a heavy anvil. The cheapest way to get one is to purchase a 2 1/2 foot chunk of train track rail. (You say "that's not an anvil, that s just a piece of steel", I would respond, "It's better than a real anvil for most fabrications"). It will have two different angles of rounded surfaces on the top (one side gets heavily worn from years of trains running over it) and when flipped over a great flat surface and some reasonably squared edges for bending. Have a piece of steel welded across the end so it will stand up solidly whether right side up or upside down. This will run you about $2.00 for the steel and $10 for the welding. You should also pick up two bar stock pieces that are 3 by 1/2 and the length of your rail.
- Drill - Most homeowners have a drill but you probably want at least a 3/8s variable speed (if you can afford it, go for 1/2 inch) and not a battery operated. These will run you $40 to $150.
- Drill Bits - Drill bits can cost more than your drill but for starting out you can probably get by with the $9.00 set from mail order catalogs and if you really want to splurge (and your drill will handle them) a set of Silver & Deming large bits will set you back at least $19.00. If you are made of money, you can get high quality bits that will cost $15.00 each but I'm not and I assume you aren't either.
- File - when smoothing edges or even finishing the flat surfaces of sheet metal, I have found that the most economical files are those sold for filing the guides and teeth of a chain saw chain. I use round and flat files from the local saw shop for all manner of bench and sheet metal work. These are made by "Oregon". They are not rigid enough for mechanical work such as the large expensive files needed for smoothing heads or oil pump covers. If you have the expensive files needed for that type of work, save them for that type of work! The large solid files will be destroyed just as quickly but cost about 10 times more.
- Hammers - You need a couple of ball peins, one large and one small. For the sheet metal work you can also pick up a hammer and dolly starter set for about $15.00 from all the mail order catalogs. They aren't professional pieces, but we aren't professional sheet metal workers or machinists anyway. They will do fine for afterhours light duty use.
- 4 1/2 inch Angle Grinder - You should have one of these little 12,000 RPM wonders. Using 1/8 inch wheels they will work great for cutting sheet metal, Mesh screen, Bar stock and tubing. Using the 1/4 inch wheels lets you shape steel and grind off welds. Lastly using the wire brush will let you delicately finish surfaces that may have been marred during your processes. They are available from $30 to $150. I would recommend selecting the higher priced models. A word of warning, these are dangerous, they throw a myriad of sparks (can start fires) and can kick back ferociously (at your face, arms, fingers or anything in the way, and the wheels and brushes can and do fly apart (safety glasses are a must). Read the safety information that comes with them.
- C-Clamps - Always handy and cheap, pickup a set of large clamps. Vise-Grips (and the similar looking locking pliers from other companies) are also very handy for quickly clamping your work.
Ok, so there are some costs associated in getting started. Even more if you want to do all processes yourself. Things like Wirefeed Welders, sheet metal brakes, torches and tanks cost serious dollars. Avoiding the more expensive items when starting out, gets you in the door for a minor investment in tools and I have yet to find that purchasing a tool is a bad way to use your money.
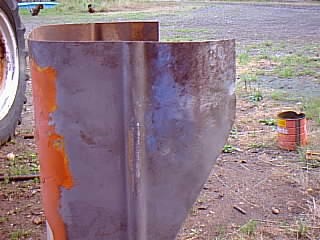
This begins a series of articles where I will just scratch the surface of the things you can make yourself. In some of those, I will show some plans and describe what I have done to make these components. We will start this in the next article but for this month, I will leave you with an extremely simple example of something you can do yourself. This type of project is commonly needed and a real confidence builder. Remember that the first project does not have to be a standalone component. As an example, making a simple insert to replace a badly rotted portion of a hood is a simple and fulfilling project. Even with farming out the welding to a local shop, you will pay far less than complete replacement of the hood and retain the original components to boot. Below is pictured just such an example. You can see the chunk of metal missing
on the bottom of the hood facing you.
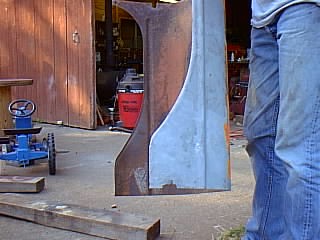
This is an Allis-Chalmers IB hood that had section virtually missing. Finding another hood that was in better shape would be far more expensive than simply cutting, bending and welding in the insert. The project involves the following:
- Sand all paint from the areas to be worked.
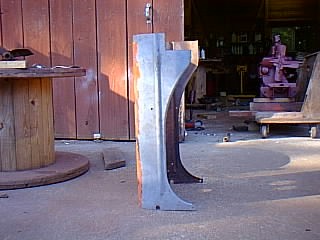
- Cut out a square section that removes all of the bad metal. It is important to cut beyond the damage because when you take the pieces to the welder, any thin pitted surfaces will self-destruct. You also want to remove the section in a shape that will be easy to reproduce. I prefer a square piece with clean right angles. Below is a picture of the same hood with the
bad metal cut out.
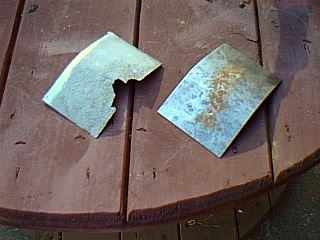
- Cut out a section of the same thickness sheet metal. The big mistake I have seen here is attempting to use a slightly thicker or thinner replacement piece. Doing so will result in a poor joint. Below is a picture of the piece of bad sheet metal next to the replacement section.
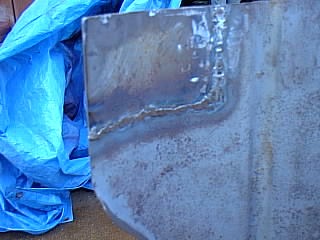
- Bend the new piece to match the contour of hood. No sheet metal brake here, not even a hammer, I simply bent the piece with my fingers until it matched exactly.
- Clamp the piece in position and take it to the welder. It is usually very inexpensive to get a weld done like this since it is ready for them to run the bead. Be sure it lines up perfectly since it will be welded exactly as you have set it up. I clamped this with my old trusty garage sale visegrips (I pick up every pair I see less than $3.00, have a whole hand drawer full) since their small clamping surface is less likely (than C-Clamps) to straighten my bends yet alone the bends on the factory portion. Below is a picture of the new piece welded in.
- Angle grind the weld bead till nearly flat. Grinders cut quickly so go carefully and slowly.
- Hand file the remainder of the bead. This is important because the grinder will begin to remove the actual sheet metal too easily.
- Sand until smooth. The most enjoyable but time consuming part of this simple project is the final filing and sanding such that the new metal insert is imperceptibly seamless. If there are some small pits in the surface from the welding, you may need want to fill with a small amount of JB-Weld or similar epoxy for steel but you probably will not need it after a thorough filing and sanding. Below is the hood with the welds sanded.
Ok, we didn't make the hood, but we did make a piece of it, saved a lot of money and now a piece of the tractor has a personal touch that goes beyond a coating of paint, a set a plugs or few quarts of oil. The best part of this little fabrication was when I showed it to a friend. Not having told him what I had done, he said "So what am I supposed to be looking at, you sanded one side of the hood?", then I showed him the still-exposed welds on the backside with no small amount of pride.
Copyright © 1997-2024 Yesterday's Tractor Co.
All Rights Reserved. Reproduction of any part of this website, including design and content, without written permission is strictly prohibited. Trade Marks and Trade Names contained and used in this Website are those of others, and are used in this Website in a descriptive sense to refer to the products of others. Use of this Web site constitutes acceptance of our User Agreement and Privacy Policy
TRADEMARK DISCLAIMER: Tradenames and Trademarks referred to within Yesterday's Tractor Co. products and within the Yesterday's Tractor Co. websites are the property of their respective trademark holders. None of these trademark holders are affiliated with Yesterday's Tractor Co., our products, or our website nor are we sponsored by them. John Deere and its logos are the registered trademarks of the John Deere Corporation. Agco, Agco Allis, White, Massey Ferguson and their logos are the registered trademarks of AGCO Corporation. Case, Case-IH, Farmall, International Harvester, New Holland and their logos are registered trademarks of CNH Global N.V.
Yesterday's Tractors - Antique Tractor Headquarters
Website Accessibility Policy
-
This site uses cookies to help personalise content, tailor your experience and to keep you logged in if you register.
By continuing to use this site, you are consenting to our use of cookies.
|
